|
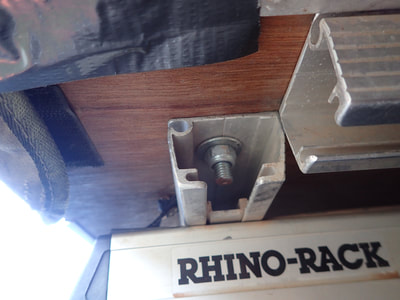
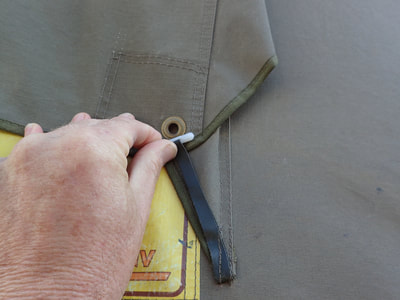
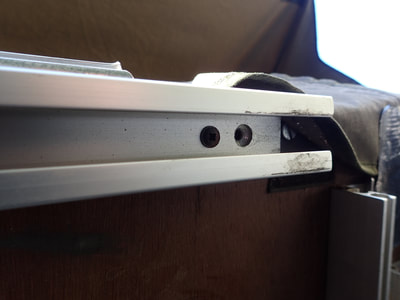
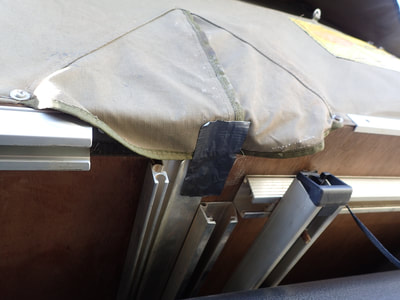
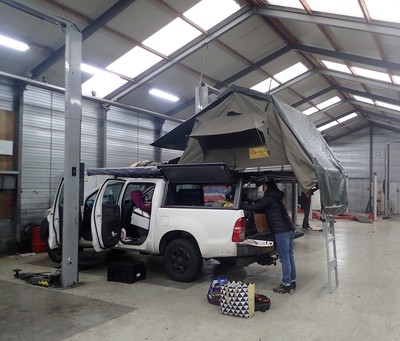
I have been putting this off for a long time and even debated wether to do it at all. I need to start by saying the Eezi Awn roof tent was not our first choice of tent. Initially, our choice was 80% based on price and 20% on features. At the end, the choice was 100% based on availability. We were setting up our vehicle for a 2 year trip and we wanted to have the entire setup completed in as short a time as possible, so we were not in a position to be waiting a month for a tent to arrive from South Africa on the next ship and air freighting was completely out of the question, so we had to find a stock item. We had shopped around all the suppliers in the UK and some in Europe looking for a roof tent that was 1.6 meters wide. This was the widest possible tent that would fit on the canopy of our Hilux and open out over the back of the vehicle. For us this was a must. It would provide shelter and shade to the back of the car and allow us to camp in a 1 car wide space. For us this configuration has worked really well and the extra width has been great for the hours we spend relaxing up in the tent. The price difference was wide between the different makers although the features and benefits were all pretty much the same and let’s face it, it’s a roof tent and there are only so many ways it can be made. One of the main differences was the material, polycotton or full synthetic. Having done lots of hiking we know the types of fabric and the difference they can make to durability and water resistance and of course, weight. Our preference was to find a synthetic tent because it would absorb less moisture and be a little lighter overall. This tent needed to last 2 years not 10 so synthetic would have been fine. To cut a long story short on the selection process, the only supplier ended up being APB Trading and the tent they supplied was an Eezi Awn 1.6 T-Top Xklusiv. The Eezi Awn product was the second most expensive on the market after Hannibal tents which were almost a third as much again and we had to stretch our budget to get the Eezi Awn but still cheaper than waiting around in a UK hotel for anything else, so we went with it. APB were great and did the job well and on time. We took delivery and Phil showed us the set up and we did a test setup in his yard. He was careful to point out to us that the porch over the ladder has a hinged bar and he said ‘The hinges will break at some stage’ and he was right and they didn’t last more than a month, but I am getting ahead of myself. The packed down tent is a tidy package with a sturdy cover that has 2 click together straps either side and a ratchet strap to pull the bottom of the cover tight around the closed and folded tent meaning it will stay dry and dust free no matter what the conditions. As with anything new, it took us a few attempts to get the cover on and looking good. Having the tent mounted to open over the back meant the ratchet strap was at the back so I can stand on the bumper to do the opening and final closing. If you’re shorter than 6ft, you will need something to stand on to comfortably reach (I guess depending on the vehicle) We were never able to get the tent closed up nicely and all the sides tucked in without one of us getting up on to the top of the car and lifting the tent open slightly so the other can tuck in the sides of the tent that billow out when its being folded up. For us, this extra effort was worth it as it also made getting the cover on much easier. We also added 2 extra straps either side to hold it all in. On this Eezi Awn tent, the cover comes off completely, unlike some tent brands where the cover remains attached and hangs down or needs to be tucked or pushed up out of the way. We can pull the cover off and it’s loosely folded (or just chucked to the side) and it is not in the way or flapping in the breeze. Opening the tent is also easy but requires again getting access to the very top of the tent so the ladder can be unfastened and extended as the ladder is how the tent is unfolded (some agility is needed for this!). Pull the ladder out and down and hey presto, the tent is up. We store all our bedding in the tent including memory foam pillows, sleeping bags and extra blankets, so once it’s up, we can climb in and sleep, just like any roof tent. As mentioned above, this tent was not the cheapest on the market but really, other than the porch arrangement (which we really like) it’s just like most of the other RTTs. We were told that the Eezi Awn was the Rolls Royce of Roof Tents and this is where things got a bit sour for us. The actual quality of the construction and finish is terrible. Nothing quite fits and matches right and some of the fastening points and Velcro is either missing altogether or won’t meet at all. Laying in the tent and comparing the 2 sides I can see they are quite different. One side is ‘finished’ the other appears to be cut and stitched differently with seams not fully stitched and sewing lines not straight and in places the fabric is baggy. The external window shades/awnings on either side cannot be secured because the straps just don’t reach the eyelet holes at all. Mild steel nickel plated fasteners (screws) have been used that rusted and broke within the first few months. I have had to re-drill and re-screw the bar that holds the porch extension out as it was held in place by only a few (mild steel) screws that pulled out of the timber base in the first few weeks. The tent is held onto the 3-rail Rhino roof rack by 2 alloy bars on each side. These 2 rails are attached by only 10 alloy rivets, 5 each side. Each one only a few mm in diameter. These didn’t last long at all and I noticed the tent moving and bouncing on the car on rough roads and upon inspection it was being held by 3 lonely rivets and the straps that hold the cover on and at any time it could have just fallen off the back of the car, no matter how strong the actual roof rack was. The rivets went through the timber base and it might have been the give in the timber that allowed them to move and fail. I drilled and bolted it down on each corner with s/steel bolts and locking nuts and it now remains secure. When we were shopping for tents, we were also told by Eezi Awn and Hannibal that the timber base is better because it ‘breathes’. Actually, it doesn’t breathe at all and the underside of the mattress is constantly damp but this is something all RTTs will have a problem with in humid conditions. The rain fly has been a problem and it won’t sit taut and pools water above the porch no matter how we set it up so in rain I have to wake up and push the water off the top of the porch to stop the weight of it breaking the light alloy bars that hold it out. In heavy rain, the weight of the water sitting on the fly is so great it hard to even push it up to dump the water. The way the tent was from new, the straps that hold the fly on couldn’t be adjusted at all. Just a buckle on a loop of webbing. I am sure this was another error in the construction rather than the design. I cut one end and re threaded them and then I could adjust the tension on each mounting point. It helped but didn’t solve the problem with the fly being loose at the porch end. Each night we have to use duct tape to seal the tent to stop bugs getting in as the Velcro won’t meet at the hinge points. And the doors…. we have woken on many (sadly very many) occasions to find the tent full of potentially malaria carrying bugs because the insect mesh is held in place at the bottom of the door by a strip of Velcro and not a zip, so when we move at night it’s possible to kick the mesh at either end of the tent away from the Velcro and let the bugs in… not ideal at all and a real design flaw. Securing the Velcro is difficult due to the mattress hanging over the end and the Velcro and the mattress has to be lifted all the way along to get a good fastening and now after a year, the Velcro is losing its grip, so it’s more bugs for us in the future…The insect mesh that’s been used is sturdy but in hot, still conditions it blocks any draft so we bought a standard mosquito net that we hang inside the tent so we can have all the doors and windows open, then we don’t drown in our own sweat. The bar that holds the porch out is square section alloy with very sharp corners and over time they have ripped the tent, again a poor design that needed more thought. The mattress although comfortable, is slightly too big for the tent on each side and touches the sides so in damp or rainy conditions, moisture transfers through the tent fabric to the mattress and it has to be dragged out and dried when possible and sometimes it can take days or weeks to get suitable conditions to do that. We also added yoga mats under the mattress to give just a little more comfort as when damp (most of the time) the mattress compresses down to just about nothing and the mats allow us to sleep through the night. And, as mentioned, the hinges on the porch extension bar both broke within the first month, just as we were told they would. The tent also came with 4 sides to close in the back porch. Well made, and they had been adjusted to fit our vehicle height by APB. The only time the sides were all used was after the first night we slept in it and that was just to see if it all worked and to take a photo or 2. We left one side (front one that closed off the tailgate area, didn’t really fit and we knew we wouldn’t use it) with a friend in Europe and then we chucked the rest in the bin after carrying them around for 6 months. The main reason we got rid of them was the hard plastic parts that were attached to the main roof tent, to attach the sides to, would touch the alloy porch support and make it ring like a bell in even the slightest of breezes and it got to a point where we could take it no longer and one morning I just cut them all off, so no more sides… Again, some design thought (and maybe some field testing...?) would have sorted this rather annoying problem out. Also, the option of purchasing the tent without the sides would have been nice. An overall rating for this tent is hard to do as this is our first Roof Top tent and we haven’t had the chance to compare it to many others but based only on the quality of the construction and the design and finish, I rate it poorly. We have been camping and hiking for a long time and have overall lived in tents of one kind or another for sometimes months at a time. I have never owned a ‘tent’ constructed as poorly as this Eezi Awn. I rate it 3.5/10 and not worth the premium we paid. If I had paid less I might have been able to overlook some of the faults but I don’t see any excuse for not using stainless steel screws at the very least. As with all things on my website, this is my opinion based on my experience.
5 Comments
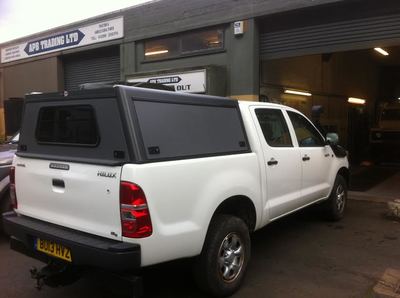
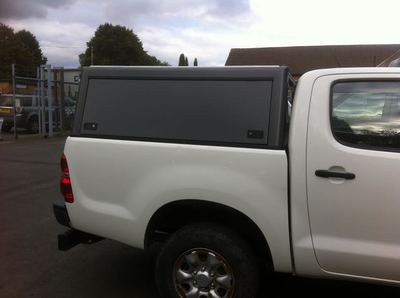
Why a special alloy canopy? The GRP canopies that are sometimes delivered with the new vehicle or fitted from the wide range of available manufactures might be OK for light loads on urban roads, but not for mile after mile of car breaking roads in remote places, loaded with roof tents and who knows what else. We wanted to finish this trip with the things we started with, so tough was the overall requirement, and we didn’t think the GRP or roto-moulded plastic ones even with an internal frame were going to last, so we wanted a suitable alloy canopy that was welded together. We could have bought a vehicle with or without a canopy but to be honest, it was a little easier to get one without. The decision to get this brand of canopy was pretty easy for us. We only saw 2 brands. The other one was a custom build. This was a time critical build for us - we had expected to buy everything we needed off the shelf and were a bit surprised at the lack of choice in the UK, but when we had a good look at the Bushtech we felt more relaxed as it had all the features we were looking for. We wanted the following from the canopy
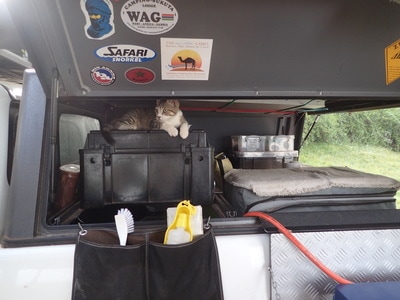
By far the best feature for us is the 3 opening doors that allow us to access every inch of the back of the vehicle. They each have 2 gas struts so they swing open nicely when the latches are released and every latch can be locked for good security. We cook from the left side, the fridge and prep areas are at the rear, and the right side is the workshop and storage area. With all the doors open we can be camp ready in seconds and packing up is equally as fast. We bought a few custom extras to fit it. A rack that fits the ‘wolf box’ type storage boxes fits up against the headboard end, holding 3 boxes with secure screw down fasteners, and a removable stove table that folds up for easy storage. We also opted for the dust kit. I am not sure why this is an option and at £75 should really be a standard feature absorbed into the total price. I couldn’t imagine not having the dust kit. It would be a nightmare of dust and dirt every day to deal with otherwise and it works perfectly. I installed LED lighting on the left and rear doors. We had always planned on having a drawer system for storage but we didn’t for a number of reasons. Number one was the £1500 price tag for the basic 2 drawer system, number 2 was the dead space we would have created around the edges and back, and number 3 was the un-necessary weight of the system. Instead, we have 9 plastic boxes! Sounds a bit like we will be replacing boxes all the way to New Zealand? We hope not and so far, they have worked out exceptionally well mainly due to the ability to access them via the canopy doors. It’s a very simply and evolving system that works a bit like this: We have 4 main 30 litre boxes stacked 2 high next to the fridge and accessed from the rear. 2 have cooking, eating and prep items and 2 have some bulk and everyday food items. We can access most of the bottom boxes without removing the top box and they easily slide in and out if we want them to. On top of one stack is a smaller 18 litre box called ‘Dave’s coffee stuff’ (which is full of my coffee things) and on the other stack 2 smaller 5 litre ones that have cutlery and tea towels, paper towels n’ stuff. These are all secured with a strap to stop bouncing and sliding. Right at the headboard we have a 75 litre box with our bulk items and another 30 litre box with bedding, towels and washing items. Above them is the rack with the wolf boxes. The 75 litre box is a little hard to get at, but if I move a few things around I can be in it within 30 seconds of stopping. We have a space in between the big box and the 4 smaller boxes that holds the gas bottles, BBQ, the awning shade and insect room. When it’s packed ready for the road, nothing moves or slides. The boxes are exactly the right size, but not by accident. As soon as we bought the vehicle, we measured the width and depth of the tray and spent hours and hours on the internet looking for good quality, tough boxes to fit. We found the brand ‘Really Useful Boxes’ at B&Q hardware UK, and so far, they have been an excellent choice. We have water containers and the stove in the wheel well area to fill out the dead space, but it’s the all-round access provided by the canopy that makes it all work so well. The canopy has 2 rails welded into the top and the roof inside. This allow for various fittings to be secured inside and out. On the roof, we have 3 x Rhino bars that hold our 1.6m wide tent and in front of them I have 2 sand ladders secured on the same rails. Inside on the roof, we have the table that is simply held up with bungee cords. Another factory accessory is available for the table but the solution we have is working pretty well for now and it’s a lighter and cheaper solution. The options for fitting different racks and tents are endless on these welded rail systems and we have room for expanding our options as we travel. What we don’t like? It’s just the locks. When we were in the Arctic Circle they froze as rain water can run into the key slot and build up, and now we are in Africa we are having problems with the dust getting in them. Sometimes it can take me several minutes to get the key in and turned and with 6 locks it can be a pain. I have been told they are the premium quality fitting by another overland vehicle builder but the key hole needs a redesign to include a rubber dust cap. It may be that the lock should not be mounted facing up for this reason? I have a compressor and lightly dust them out when I remember. Otherwise it’s just fine. For us, the canopy is the real gem of this overland vehicle and we have often commented on how well it works and how good it looks. We saw a vehicle with a GRP canopy not long ago and we both agreed we made the right choice on getting a custom-built canopy. Right now, it’s our kitchen, workshop, storage unit and bar and it does all those jobs well! It’s also become the home for our travelling cat, Luxy. She spends our camping days on the wolf boxes or the fridge snoozing in the shade or out of the rain. |
Just our thoughts...We completed the build of our overland vehicle in just 10 days! That's from taking delivery of the car to heading off on Our Epic Trip. ArchivesCategories
All
|
Proudly powered by Weebly


 RSS Feed